一、介绍
Mysql Cluster 是一种技术,其主要功能是在无共享的相关系统中部署内存中数据库的Cluster,其主要是通过NDB Cluster(简称NDB)存储引擎来实现的。
NDB 存储引擎也叫NDB Cluster 存储引擎,主要用于MySQL Cluster 分布式集群环境,Cluster 是MySQL 从5.0 版本才开始提供的新功能。

NDB Cluster Core Concepts

NDBCLUSTER (also known as NDB) is an in-memory storage engine offering high-availability and data-persistence features.
The NDBCLUSTER storage engine can be configured with a range of failover and load-balancing options,
but it is easiest to start with the storage engine at the cluster level.
NDB Cluster's NDB storage engine contains a complete set of data,
dependent only on other data within the cluster itself.
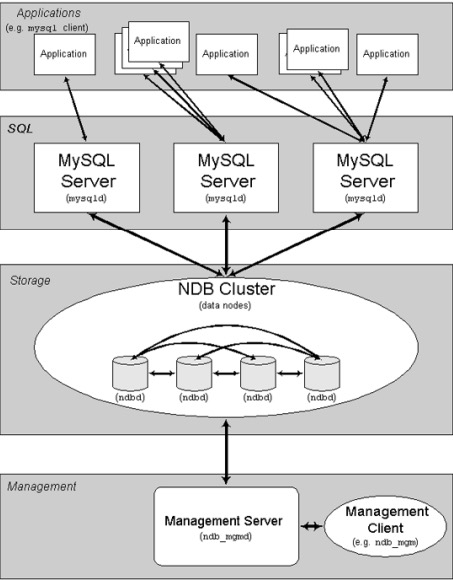
ndbcluster的架构图
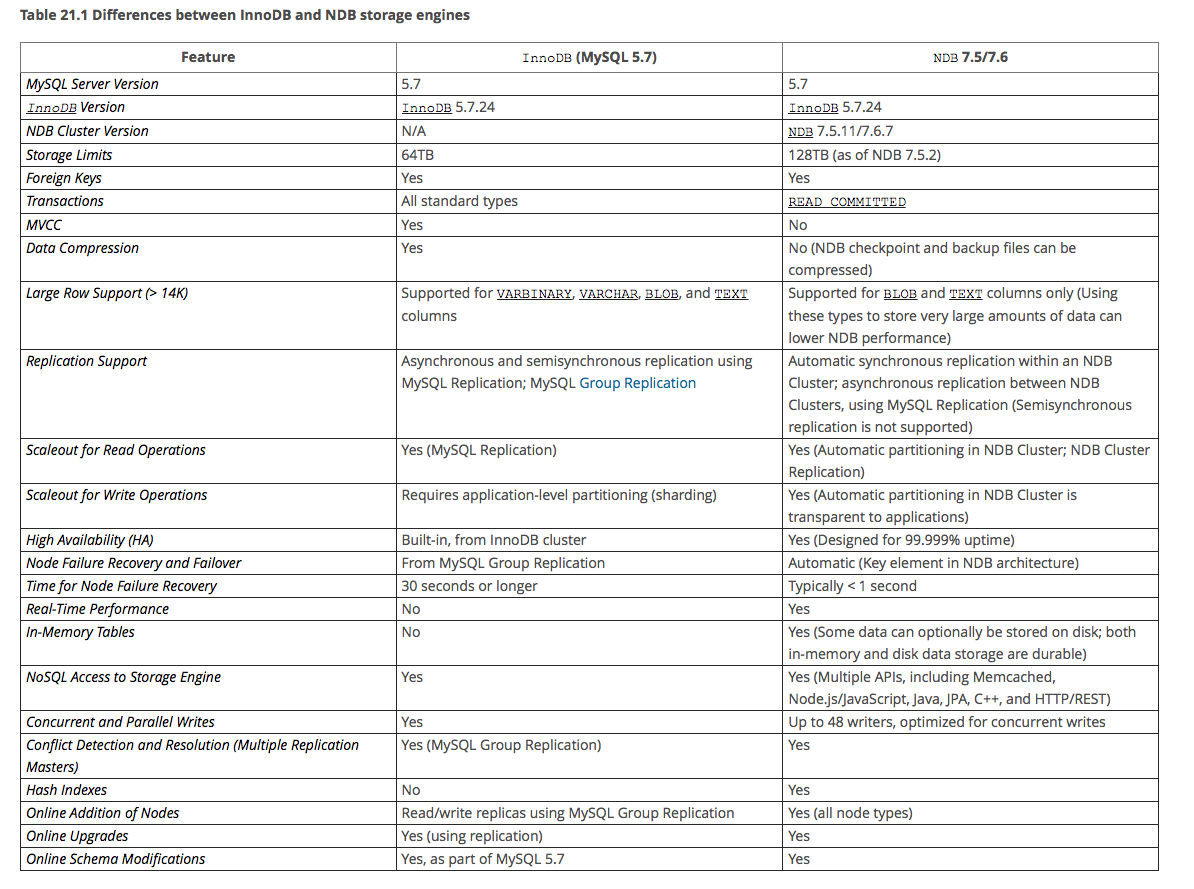
InnoDB 和 NDB 存储引擎的对比
二、环境准备
mysql镜像准备

步骤
1、进入之前java容器,下载mysql并配置必要信息
[root@izbp13cqwumhn4wi93is2wz ~]# docker exec -it 29319265f477 /bin/bash
root@29319265f477:/#

2、进入home目录,下载mysql cluster
root@29319265f477:/# cd home/
root@29319265f477:/home# wget http://mirrors.sohu.com/mysql/MySQL-Cluster-7.5/mysql-cluster-gpl-7.5.6-linux-glibc2.5-x86_64.tar.gz
root@29319265f477:/home# ll
total 831392
drwxr-xr-x  2 root root        66 Jul  9 07:29 ./
drwxr-xr-x 21 root root       242 May 23 12:51 ../
-rw-r--r--  1 root root 851342279 Jan  5  2017 mysql-cluster-gpl-7.5.5-linux-glibc2.5-x86_64.tar.gz
root@29319265f477:/home#

3、解压
root@29319265f477:/home# tar zxvf mysql-cluster-gpl-7.5.5-linux-glibc2.5-x86_64.tar.gz -C /usr/local/

4、进入/usr/local,建立软连接
root@29319265f477:/home# cd /usr/local/
root@29319265f477:/usr/local# ln -s mysql-cluster-gpl-7.5.5-linux-glibc2.5-x86_64 mysql

5、复制ndbd数据节点执行文件到/usr/local/bin
root@29319265f477:/usr/local# cd mysql
root@29319265f477:/usr/local/mysql# cp bin/ndbd /usr/local/bin/ndbd
root@29319265f477:/usr/local/mysql# cp bin/ndbmtd /usr/local/bin/ndbmtd

6、复制ndb_mem管理配置节点执行文件到/usr/local/bin
root@29319265f477:/usr/local/mysql# cp bin/ndb_mgm* /usr/local/bin

7、Configuring the data nodes and SQL nodes.
root@29319265f477:/usr/local/mysql# vim /etc/my.cnf

[mysqld]
ndbcluster

[mysql_cluster]
ndb-connectstring=192.168.0.2,192.168.0.3

8、Configuring the management node.
root@29319265f477:/usr/local/mysql# mkdir /var/lib/mysql-cluster
root@29319265f477:/usr/local/mysql# cd /var/lib/mysql-cluster
root@29319265f477:/var/lib/mysql-cluster# vim config.ini

[ndbd default]
NoOfReplicas=2
DataMemory=80M
IndexMemory=18M
ServerPort=2202

[ndb_mgmd]
NodeId=1
HostName=192.168.0.2
DataDir=/var/lib/mysql-cluster

[ndb_mgmd]
NodeId=2
HostName=192.168.0.3
DataDir=/var/lib/mysql-cluster

[ndbd]
HostName=192.168.0.4
NodeId=3
DataDir=/usr/local/mysql/data

[ndbd]
HostName=192.168.0.5
NodeId=4
DataDir=/usr/local/mysql/data

[mysqld]
NodeId=5
HostName=192.168.0.6

[mysqld]
NodeId=6
HostName=192.168.0.7

保存退出vim,并创建目录 /usr/local/mysql/data
root@29319265f477:/usr/local/mysql# mkdir /usr/local/mysql/data

9、退出java容积并构建mysql镜像
docker commit -m 'mysql cluster' 29319265f477 ubuntu:mysql_cluster

10、查看构建的mysql镜像
[root@izbp13cqwumhn4wi93is2wz ~]# docker images
REPOSITORY                      TAG                 IMAGE ID            CREATED             SIZE
ubuntu                          mysql_cluster       369ce5a0f7bc        2 minutes ago       5.35 GB
ubuntu                          zookeeper           bb9006876c2f        6 weeks ago         1.04 GB
ndbcluster节点准备:
manage node 1 : 192.168.0.2
manage node 2 : 192.168.0.3
data node 1: 192.168.0.4
data node 2: 192.168.0.5
sql node 1: 192.168.0.6
sql node 2: 192.168.0.7
步骤
1、创建单独的网络
[root@izbp13cqwumhn4wi93is2wz ~]# docker network create cluster --subnet=192.168.0.0/16

2、新开ssh窗口,创建容器:manage node 1
[root@izbp13cqwumhn4wi93is2wz ~]# docker run -it --net=cluster --name mysqlcluster_mem_1 --ip=192.168.0.2  ubuntu:mysql_cluster

3、新开ssh窗口,创建容器:manage node 2
[root@izbp13cqwumhn4wi93is2wz ~]# docker run -it --net=cluster --name mysqlcluster_mem_2 --ip=192.168.0.3  ubuntu:mysql_cluster

4、新开ssh窗口,创建容器:data node 1
[root@izbp13cqwumhn4wi93is2wz ~]# docker run -it --net=cluster --name mysqlcluster_datanode_1 --ip=192.168.0.4  ubuntu:mysql_cluster

5、新开ssh窗口,创建容器:data node 2
[root@izbp13cqwumhn4wi93is2wz ~]# docker run -it --net=cluster --name mysqlcluster_datanode_2 --ip=192.168.0.5  ubuntu:mysql_cluster

6、新开ssh窗口,创建容器:sql node 1
[root@izbp13cqwumhn4wi93is2wz ~]# docker run -it --net=cluster --name mysqlcluster_sqlnode_1 --ip=192.168.0.6  ubuntu:mysql_cluster

7、新开ssh窗口,创建容器:sql node 2
[root@izbp13cqwumhn4wi93is2wz ~]# docker run -it --net=cluster --name mysqlcluster_sqlnode_2 --ip=192.168.0.7  ubuntu:mysql_cluster
配置并启动节点
配置manage node 1 ,并启动
root@d33444d03568:/usr/local/mysql# vim /var/lib/mysql-cluster/config.ini

[ndbd default]
NoOfReplicas=2
DataMemory=80M
IndexMemory=18M
ServerPort=2202

[ndb_mgmd]
NodeId=1
HostName=192.168.0.2
DataDir=/var/lib/mysql-cluster

[ndb_mgmd]
NodeId=2
HostName=192.168.0.3
DataDir=/var/lib/mysql-cluster

[ndbd]
HostName=192.168.0.4
NodeId=3
DataDir=/usr/local/mysql/data

[ndbd]
HostName=192.168.0.5
NodeId=4
DataDir=/usr/local/mysql/data

[mysqld]
NodeId=5
HostName=192.168.0.6

[mysqld]
NodeId=6
HostName=192.168.0.7

root@d33444d03568:/usr/local/mysql# vim /etc/my.cnf

[mysqld]
ndbcluster

[mysql_cluster]
ndb-connectstring=192.168.0.2,192.168.0.3

启动
root@d33444d03568:/usr/local/mysql# ndb_mgmd -f /var/lib/mysql-cluster/config.ini --nowait-nodes=2

查看cluster状态
root@d33444d03568:/usr/local/mysql# ndb_mgm
-- NDB Cluster -- Management Client --
ndb_mgm> show
Connected to Management Server at: 192.168.0.2:1186
Cluster Configuration
---------------------
[ndbd(NDB)]     2 node(s)
id=3 (not connected, accepting connect from 192.168.0.4)
id=4 (not connected, accepting connect from 192.168.0.5)

[ndb_mgmd(MGM)] 2 node(s)
id=1    @192.168.0.2  (mysql-5.7.17 ndb-7.5.5)
id=2 (not connected, accepting connect from 192.168.0.3)

[mysqld(API)]   2 node(s)
id=5 (not connected, accepting connect from 192.168.0.6)
id=6 (not connected, accepting connect from 192.168.0.7)
配置manage node 2 ,并启动
/etc/my.cnf  /var/lib/mysql-cluster/config.ini  配置和manage node 1一样

启动
root@8821c92cf699:/usr/local/mysql# ndb_mgmd -c 192.168.0.2 -f /var/lib/mysql-cluster/config.ini

在管理节点1上再次查看状态,可见管理节点2已启动
ndb_mgm> show
Cluster Configuration
---------------------
[ndbd(NDB)]     2 node(s)
id=3 (not connected, accepting connect from 192.168.0.4)
id=4 (not connected, accepting connect from 192.168.0.5)

[ndb_mgmd(MGM)] 2 node(s)
id=1    @192.168.0.2  (mysql-5.7.17 ndb-7.5.5)
id=2    @192.168.0.3  (mysql-5.7.17 ndb-7.5.5)

[mysqld(API)]   2 node(s)
id=5 (not connected, accepting connect from 192.168.0.6)
id=6 (not connected, accepting connect from 192.168.0.7)
配置data node 1 ,并启动
root@19e47e6ff525:/usr/local/mysql# vim /etc/my.cnf

[mysqld]
ndbcluster

[mysql_cluster]
ndb-connectstring=192.168.0.2,192.168.0.3

启动
root@19e47e6ff525:/usr/local/mysql# ndbd
2018-07-11 02:17:09 [ndbd] INFO     -- Angel connected to '192.168.0.2:1186'
2018-07-11 02:17:09 [ndbd] INFO     -- Angel allocated nodeid: 3

在管理节点1上再次查看状态,可见数据节点1已启动
ndb_mgm> show
Cluster Configuration
---------------------
[ndbd(NDB)]     2 node(s)
id=3    @192.168.0.4  (mysql-5.7.17 ndb-7.5.5, starting, Nodegroup: 0)
id=4 (not connected, accepting connect from 192.168.0.5)

[ndb_mgmd(MGM)] 2 node(s)
id=1    @192.168.0.2  (mysql-5.7.17 ndb-7.5.5)
id=2    @192.168.0.3  (mysql-5.7.17 ndb-7.5.5)

[mysqld(API)]   2 node(s)
id=5 (not connected, accepting connect from 192.168.0.6)
id=6 (not connected, accepting connect from 192.168.0.7)
配置data node 2 ,并启动
root@4f14fb18ebeb:/usr/local/mysql# vim /etc/my.cnf

[mysqld]
ndbcluster

[mysql_cluster]
ndb-connectstring=192.168.0.2,192.168.0.3

启动
root@4f14fb18ebeb:/usr/local/mysql# ndbd
2018-07-11 02:19:17 [ndbd] INFO     -- Angel connected to '192.168.0.2:1186'
2018-07-11 02:19:17 [ndbd] INFO     -- Angel allocated nodeid: 4

在管理节点1上再次查看状态,可见数据节点2已启动
ndb_mgm> show
Cluster Configuration
---------------------
[ndbd(NDB)]     2 node(s)
id=3    @192.168.0.4  (mysql-5.7.17 ndb-7.5.5, Nodegroup: 0, *)
id=4    @192.168.0.5  (mysql-5.7.17 ndb-7.5.5, Nodegroup: 0)

[ndb_mgmd(MGM)] 2 node(s)
id=1    @192.168.0.2  (mysql-5.7.17 ndb-7.5.5)
id=2    @192.168.0.3  (mysql-5.7.17 ndb-7.5.5)

[mysqld(API)]   2 node(s)
id=5 (not connected, accepting connect from 192.168.0.6)
id=6 (not connected, accepting connect from 192.168.0.7)
配置sql node 1 ,并启动
root@e4afa0b9ac00:/usr/local/mysql# vim /etc/my.cnf

[mysqld]
ndbcluster
datadir=/usr/local/mysql/data
socket=/usr/local/mysql/data/socket

[mysql_cluster]
ndb-connectstring=192.168.0.2,192.168.0.3

创建个mysql用户组和用户
root@e4afa0b9ac00:/usr/local/mysql# groupadd mysql
root@e4afa0b9ac00:/usr/local/mysql# useradd -g mysql -s /bin/false mysql

初始化sql节点 ,会产生一个空的root密码
root@e4afa0b9ac00:/usr/local/mysql# ./bin/mysqld --initialize-insecure --user=mysql

启动
root@e4afa0b9ac00:/usr/local/mysql# ./bin/mysqld_safe &

在管理节点1上再次查看状态,可见sql节点1已启动
ndb_mgm> show
Cluster Configuration
---------------------
[ndbd(NDB)]     2 node(s)
id=3    @192.168.0.4  (mysql-5.7.17 ndb-7.5.5, Nodegroup: 0, *)
id=4    @192.168.0.5  (mysql-5.7.17 ndb-7.5.5, Nodegroup: 0)

[ndb_mgmd(MGM)] 2 node(s)
id=1    @192.168.0.2  (mysql-5.7.17 ndb-7.5.5)
id=2    @192.168.0.3  (mysql-5.7.17 ndb-7.5.5)

[mysqld(API)]   2 node(s)
id=5    @192.168.0.6  (mysql-5.7.17 ndb-7.5.5)
id=6 (not connected, accepting connect from 192.168.0.7)

登录mysql修改root密码,此时root密码空
root@e4afa0b9ac00:/usr/local/mysql# ./bin/mysql -h 127.0.0.1 -p
Enter password:
Welcome to the MySQL monitor.  Commands end with ; or \g.
Your MySQL connection id is 5
Server version: 5.7.17-ndb-7.5.5-cluster-gpl MySQL Cluster Community Server (GPL)

Copyright (c) 2000, 2017, Oracle and/or its affiliates. All rights reserved.

Oracle is a registered trademark of Oracle Corporation and/or its
affiliates. Other names may be trademarks of their respective
owners.

Type 'help;' or '\h' for help. Type '\c' to clear the current input statement.

mysql> set password for root@localhost=password("root");
mysql> flush privileges;

退出重新登录,此时密码root
root@e4afa0b9ac00:/usr/local/mysql# ./bin/mysql -h 127.0.0.1 -p

创建msyql用户用于远程连接
mysql> create user mysql identified by "mysql";
mysql>  grant all privileges on *.* to 'mysql'@'%' identified by 'mysql' with grant option;
mysql> flush privileges;

测试远程连接,在另个容器中去连接,
root@460fa51b62af:/usr/local/mysql# ./bin/mysql -h 192.168.0.6 -u mysql -p
Enter password:
Welcome to the MySQL monitor.  Commands end with ; or \g.
Your MySQL connection id is 8
Server version: 5.7.17-ndb-7.5.5-cluster-gpl MySQL Cluster Community Server (GPL)

Copyright (c) 2000, 2017, Oracle and/or its affiliates. All rights reserved.

Oracle is a registered trademark of Oracle Corporation and/or its
affiliates. Other names may be trademarks of their respective
owners.

Type 'help;' or '\h' for help. Type '\c' to clear the current input statement.

mysql>

可见使用mysql用户能远程连接上sql节点1
配置sql node 2 ,并启动
和sql node 1操作一样,此处省略

在管理节点1上再次查看状态,可见sql节点1已启动
ndb_mgm> show
Cluster Configuration
---------------------
[ndbd(NDB)]     2 node(s)
id=3    @192.168.0.4  (mysql-5.7.17 ndb-7.5.5, Nodegroup: 0, *)
id=4    @192.168.0.5  (mysql-5.7.17 ndb-7.5.5, Nodegroup: 0)

[ndb_mgmd(MGM)] 2 node(s)
id=1    @192.168.0.2  (mysql-5.7.17 ndb-7.5.5)
id=2    @192.168.0.3  (mysql-5.7.17 ndb-7.5.5)

[mysqld(API)]   2 node(s)
id=5    @192.168.0.6  (mysql-5.7.17 ndb-7.5.5)
id=6    @192.168.0.7  (mysql-5.7.17 ndb-7.5.5)

可见 sql 节点 2 成功启动
测试
在sql node 1上创建一张表看是否在sql node 2上能访问
sql node 1 上:
mysql> create database world;
mysql> use world;
Database changed
mysql> DROP TABLE IF EXISTS `City`;
Query OK, 0 rows affected, 1 warning (0.00 sec)

mysql> CREATE TABLE `City` (
    ->   `ID` int(11) NOT NULL auto_increment,
    ->   `Name` char(35) NOT NULL default '',
    ->   `CountryCode` char(3) NOT NULL default '',
    ->   `District` char(20) NOT NULL default '',
    ->   `Population` int(11) NOT NULL default '0',
    ->   PRIMARY KEY  (`ID`)
    -> ) ENGINE=NDBCLUSTER DEFAULT CHARSET=latin1;

INSERT INTO `City` VALUES (1,'Kabul','AFG','Kabol',1780000);
INSERT INTO `City` VALUES (2,'Qandahar','AFG','Qandahar',237500);
INSERT INTO `City` VALUES (3,'Herat','AFG','Herat',186800);

mysql> show tables;
+-----------------+
| Tables_in_world |
+-----------------+
| City            |
+-----------------+
1 row in set (0.01 sec)

mysql> select * from City;
+----+----------+-------------+----------+------------+
| ID | Name     | CountryCode | District | Population |
+----+----------+-------------+----------+------------+
|  3 | Herat    | AFG         | Herat    |     186800 |
|  1 | Kabul    | AFG         | Kabol    |    1780000 |
|  2 | Qandahar | AFG         | Qandahar |     237500 |
+----+----------+-------------+----------+------------+
3 rows in set (0.00 sec)

mysql>

sql node 2 上:

mysql> show databases;
+--------------------+
| Database           |
+--------------------+
| information_schema |
| mysql              |
| ndbinfo            |
| performance_schema |
| sys                |
| world              |
+--------------------+
6 rows in set (0.00 sec)

mysql> use world;
Reading table information for completion of table and column names
You can turn off this feature to get a quicker startup with -A

Database changed
mysql> select * from City;
+----+----------+-------------+----------+------------+
| ID | Name     | CountryCode | District | Population |
+----+----------+-------------+----------+------------+
|  3 | Herat    | AFG         | Herat    |     186800 |
|  1 | Kabul    | AFG         | Kabol    |    1780000 |
|  2 | Qandahar | AFG         | Qandahar |     237500 |
+----+----------+-------------+----------+------------+
3 rows in set (0.01 sec)

mysql>

可见sql node 2 和 sql node 1 的数据访问一样。
查看数据的分布情况,在管理节点上
ndb_mgm> ALL REPORT MEMORY
Node 3: Data usage is 1%(34 32K pages of total 2560)
Node 3: Index usage is 1%(27 8K pages of total 2336)
Node 4: Data usage is 1%(34 32K pages of total 2560)
Node 4: Index usage is 1%(27 8K pages of total 2336)

ndb_mgm>
如果要动态添加数据节点需要用到分发数据命令:
Alter online table ips reorganize partition;